Thursday 26 July 2018

How to Delete iMessage History on Mac or iPhone/iPad 2019 Guide? [Solved]


How to Delete iMessage History on Mac?

Deleting iMessage history on Mac is quite easy. There are two common methods:
Disable "Save history when conversations are closed"


On your Mac, open the Messages app.


Choose Preferences from the menu bar of Messages app.


Navigate to General and uncheck the option called ‘Save history when conversations are closed’.


Once you uncheck that option, your previous iMessage chats will disappear the next time you launch Messages on your Mac.


Delete iMessage History using Finder

If you want to delete individual or multiple messages on your Mac, then it is possible as well. Follow these instructions:


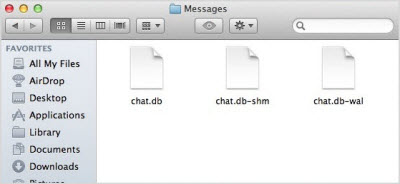
First, quit the iMessage app on your Mac.


Then launch Finder on your Mac and press CMD+Shift+G


Now type ~/Library/Messages/ in the dialog box.


Once the specified folder opens, you will need to find three certain files and delete them. Those files include chat.db-wal, chat.db-shm, and chat.db.


When you relaunch the iMessages, you will find that none of your previously existing conversations contain any data.


Sponsor Ads:

Gihosoft Free iPhone Data Recovery is a professional iPhone Data Recovery software to get back all your lost text message, photo, video, call history, note, contact and more from iPhone/iPad/iPod Touch. It offers a full solution to recover your lost data in different tough situations. Besides recovering data directly from iPhone, iPad and iPod touch, it also allows you to recover data from iCloud and iTunes backup files.

Gihosoft Android data recovery Free is a super awesome software specialized in Android file recovery. With this program, you are able to recover deleted photos, music, videos, messages, contacts, call logs, WhatsApp messages, Viber chat history and more from Samsung, Huawei, LG, HTC, Motorola, Google, Oneplus, Sony, Lenovo, ZTE and other Android devices directly. Meanwhile, this Android data recovery software is available for both Windows and Mac platforms.

Tuesday 17 July 2018

How to Create iCloud Photo Album in iOS 12 on iPhone X/8/8 Plus, iPad 2018 update


Compatible Models are iPhone X/ iPhone 8/iPhone 8 Plus, iPhone 7/7 Plus, iPhone 6S/6S Plus, iPhone 5S, iPad and MacOS Mojave compatible Macs.


After Create Shared Album we can generate the public link for share and View none icloud.com friends (Android and Windows): Share iCloud Album with anyone.
First, You Need to Enable Shared Album on your iPhone. Here’s how you can enable it.


Step 1: Launch “Settings”.


Step 2: Open “Photos” and turn on “Shared Album”.


Now We Will See How to Create iCloud Photo Album in iOS 12 on iPhone/iPad


Step 1: Open up “Photos” app from the home screen of iPhone.


Step 2: Next, make a selection of pictures and videos which you want to share with iCloud.


Step 3: Tap “Share” icon.


Step 4: From the options swipe to select “Shared Albums”.


Step 5: Tap “Shared Albums”.


Step 6: In the “Comment Box” you can entitle the album. Tap “Post”.That’s it.


Jihosoft iPhone Backup Extractor Extract and recover all types of data from iPhone backup files, such as camera roll photos, videos, SMS, contacts, reminders, WhatsApp, and etc.


If you want to create a new group, then follow the below steps.


Make sure that the person which you are inviting in the group has also enabled shared album in iPhone otherwise you have to face unexpected error.


Step 7: Below comment box, you can see Shared Album-Family (any name), will be written.


Step 8: If you want to create new “Shared Album” then tap on it. It will redirect you to next screen and there tap (+).


Step 9: Label the “Shared Album”. Tap “Next”.


Step 10: Add people with whom you want to share the album. Tap on (+).


Step 11: Move further by tapping “Next”.


Step 12: Now you have to give a specific name to your “Shared Album”.


Step 13: Tap “Post”. It’s done.


Gihosoft Free iPhone Data Recovery is a professional iPhone Data Recovery software to get back all your lost text message, photo, video, call history, note, contact and more from iPhone/iPad/iPod Touch.

Thursday 12 July 2018

How to RooHow To Root SPICE F311 Android Phone With App And With PCt SPICE F311 Android phone with Framaroot


How to Root SPICE F311 Android phone with Framaroot.

  1. Download Framaroot.
  2. Enable installation of an app from unknown sources.
  3. Install framaroot.
  4. Run framaroot.
  5. Select to install SuperSu or Superuser.
  6. Click any of the characters like Boromir and wait.

  7. Now, Downloadand Install Root checker app on your phone. Open Root checker app and click on check your phone is rooted or not.
If it is successful, reboot phone.
If it fails,
Jump to the next app.
  1. Towelroot.
It is an app developed by Geohot. The possibility of rooting your phone with this app is limited. It only Roots few phones but you might want to give it a try.

How to root SPICE F311 Android phone with Towelroot.

  1. Download Towelroot.
  2. Allow installation of an app from unknown sources.
  3. Install Towelroot.
  4. Launch Towelroot.
  5. Click on “Make it rain”
  6. Wait for your phone to be rooted.
  7. Now, Downloadand Install Root checker app on your phone. Open Root checker app and click on check your phone is rooted or not.
If it fails
If after trying to root the tablet without pc with the above apps and you fail to gain root access, then you are going to teach you how to root with PC.

How To Root SPICE F311 Android phone With PC

NOTE: When rooting a SPICE F311 or any phone with a PC. make sure that you a very good internet connection for the best result.
iRoot for me is the best rooting software that can root almost all MediaTek phone without any problem. It seems to be the last bus stop for most phones too.

How to root SPICE F311 Android phone with iRoot.

  1. Download the software.
  2. Install the software on your pc.
  3. Install ADB Driver On Your PC ( If Already installed Skip It )
  4. Get a detectable working USB cord.
  5. Enable USB debugging on your phone.
  6. Connect your phone to the PC.
  7. Wait for it to install some Drivers and app on your phone.
  8. Wait for it to detect your phone.
  9. When connected,
  10. Click Root.
  11. Now, Download and Install Root checker app on your phone. Open Root checker app and click on check your phone is rooted or not.
Please note that during the process of rooting your phone, your phone might reboot many times. Don’t worry, I guess things are working out. Once it roots your phone, you will see a success message on the screen of your pc.
  1. iSkysoft Rooting.
You might not have heard of iskysoft rooting software but its one of the best rooting software in the Android market and it is rooting thousands of phones and tablets.
How to root a SPICE F311 Android phone with iSkysoft.
  1. Launch iSkysoft.
  2. Install ADB DriverOn Your PC ( If Alrady installed Skip It )
  3. Get a working USB cord and connect your phone.
  4. Once it is connected.
  5. Click on Root Now to begin rooting.
  6. Wait for it and done, your phone is rooted.
  7. Now, Download and Install Root checker app on your phone. Open Root checker app and click on check your phone is rooted or not.
KingoRoot.
We have used the Android version of this rooting software and it didn’t work for you? don’t worry, the pc version will work you.

How to root a SPICE F311 Android phone with kingoroot software.

  • Download the software.
  • Install the software on your pc.
  • Install ADB Driver On Your PC ( If already installed Skip It )
  • Get a detectable working USB cord.
  • Enable USB debugging on your phone.
  • Connect your phone to the PC.
  • Wait for it to install some Drivers and app on your phone.
  • Wait for it to detect your phone.
  • When connected,
  • Click Root.
  • Now, Download and Install Root checker app on your phone. Open Root checker app and click on check your phone is rooted or not.
I heard that Kingoroot does not root Android 6.0 but I don’t know how true that might be, you can give it a try and tell us if it rooted your phone.
  1. Root Genius.
Root Genius is a software developed by Shuame and one of the best rooting software for Android phones.

How to root SPICE F311 Android phone with Root Genius.

  • Download the software.
  • Install the software on your pc.
  • Install ADB Driver On Your PC ( If already installed Skip It )
  • Get a detectable working USB cord.
  • Enable USB debugging on your phone.
  • Connect your phone to the PC.
  • wait for it to detect your phone.
  • Click Root it to start rooting your phone.
  • Now, Downloadand Install Root checker app on your phone. Open Root checker app and click on check your phone is rooted or not.
  1. One Click Root.
One click root like the name goes roots thousands of phones and counting. You can take the advantage of that.

Features of One Click Root are.

  • One Click Root.
  • Unroot anytime.
  • Reliability of the software.
  • Roots most Android versions and counting.
  • But most features are premium though.

How to root SPICE F311 Android phone with One Click Root.

  1. Download the software.
  2. Install the software on your pc.
  3. Install ADB Driver On Your PC ( If already installed Skip It )
  4. Get a detectable working USB cord.
  5. Enable USB debugging on your phone.
  6. Connect your phone to the PC.
  7. Wait for it to install some Drivers and app on your phone.
  8. Wait for it to detect your phone.
  9. When connected,
  10. Click Root Now.
  11. Now, Download and Install Root checker app on your phone. Open Root checker app and click on check your phone is rooted or not.
wait for it to root your phone and done.
  1. Mobogenie.
Do you know that you can root your phone using the popular mobogenie software? though it might sound new to you it still roots most phones. it works as one-click rooting and I never get a failed message. The only thing needed is a good internet connection.

How to root SPICE F311 Android phone with Mobogenie.

  1. Download Mobogenie.
  2. Install the Mobogenie to your pc.
  3. Launch the software.
  4. Install ADB Driver On Your PC ( If already installed Skip It )
  5. Get a detectable working USB cord.
  6. Enable USB debugging on your phone.
  7. Connect your phone to the PC.
  8. Wait for it to install some Drivers and app on your phone.
  9. Wait for it to detect your phone.
  10. When connected,
  11. Go to My phone.
  12. Click on One Click Root.
  13. Click Root.
  14. Now, Download and Install Root checker app on your phone. Open Root checker app and click on check your phone is rooted or not.
When it is done, check your phone and you will see a Kinguser app on your phone.

Reasons Why rooting might not work for you.

Like we said above, something someone else and it worked for, you might try it and the thing may not work for you, it does happen.
But we have listed below things that might give to the reason this method didn’t work out for you.
  1. Slow Internet Connection.
This is the number one reason of failed rooting while using kingRoot app. It needs strong Internet Connection, once you are not having a strong Internet Connection, you might keep getting Root failed message. The best thing to do is find a strong Internet Connection and you will see the magic.
  1. Cloned or an Unoriginal device.
Many phones are cloned every day due to maybe its high market demand and the Chinese are not tired of showcasing their handwork. The phone you are using might not be the original chipset of the main phone but a cloned one. Everything might look the same but the phone retailer has hammered you with the wrong product. You may have to verify very well.
and some other things that we might not have known about.
Gihosoft Android data recovery Free is a super awesome software specialized in Android file recovery. With this program, you are able to recover deleted photos, music, videos, messages, contacts, call logs, WhatsApp messages, Viber chat history and more from Samsung, Huawei, LG, HTC, Motorola, Google, Oneplus, Sony, Lenovo, ZTE and other Android devices directly. Meanwhile, this Android data recovery software is available for both Windows and Mac platforms.

How to Delete iMessage History on Mac or iPhone/iPad 2019 Guide? [Solved]

How to Delete iMessage History on Mac? Deleting iMessage history on Mac is quite easy. There are two common methods: Disable "Save hist...