Thursday, 12 July 2018

How to RooHow To Root SPICE F311 Android Phone With App And With PCt SPICE F311 Android phone with Framaroot


How to Root SPICE F311 Android phone with Framaroot.

  1. Download Framaroot.
  2. Enable installation of an app from unknown sources.
  3. Install framaroot.
  4. Run framaroot.
  5. Select to install SuperSu or Superuser.
  6. Click any of the characters like Boromir and wait.

  7. Now, Downloadand Install Root checker app on your phone. Open Root checker app and click on check your phone is rooted or not.
If it is successful, reboot phone.
If it fails,
Jump to the next app.
  1. Towelroot.
It is an app developed by Geohot. The possibility of rooting your phone with this app is limited. It only Roots few phones but you might want to give it a try.

How to root SPICE F311 Android phone with Towelroot.

  1. Download Towelroot.
  2. Allow installation of an app from unknown sources.
  3. Install Towelroot.
  4. Launch Towelroot.
  5. Click on “Make it rain”
  6. Wait for your phone to be rooted.
  7. Now, Downloadand Install Root checker app on your phone. Open Root checker app and click on check your phone is rooted or not.
If it fails
If after trying to root the tablet without pc with the above apps and you fail to gain root access, then you are going to teach you how to root with PC.

How To Root SPICE F311 Android phone With PC

NOTE: When rooting a SPICE F311 or any phone with a PC. make sure that you a very good internet connection for the best result.
iRoot for me is the best rooting software that can root almost all MediaTek phone without any problem. It seems to be the last bus stop for most phones too.

How to root SPICE F311 Android phone with iRoot.

  1. Download the software.
  2. Install the software on your pc.
  3. Install ADB Driver On Your PC ( If Already installed Skip It )
  4. Get a detectable working USB cord.
  5. Enable USB debugging on your phone.
  6. Connect your phone to the PC.
  7. Wait for it to install some Drivers and app on your phone.
  8. Wait for it to detect your phone.
  9. When connected,
  10. Click Root.
  11. Now, Download and Install Root checker app on your phone. Open Root checker app and click on check your phone is rooted or not.
Please note that during the process of rooting your phone, your phone might reboot many times. Don’t worry, I guess things are working out. Once it roots your phone, you will see a success message on the screen of your pc.
  1. iSkysoft Rooting.
You might not have heard of iskysoft rooting software but its one of the best rooting software in the Android market and it is rooting thousands of phones and tablets.
How to root a SPICE F311 Android phone with iSkysoft.
  1. Launch iSkysoft.
  2. Install ADB DriverOn Your PC ( If Alrady installed Skip It )
  3. Get a working USB cord and connect your phone.
  4. Once it is connected.
  5. Click on Root Now to begin rooting.
  6. Wait for it and done, your phone is rooted.
  7. Now, Download and Install Root checker app on your phone. Open Root checker app and click on check your phone is rooted or not.
KingoRoot.
We have used the Android version of this rooting software and it didn’t work for you? don’t worry, the pc version will work you.

How to root a SPICE F311 Android phone with kingoroot software.

  • Download the software.
  • Install the software on your pc.
  • Install ADB Driver On Your PC ( If already installed Skip It )
  • Get a detectable working USB cord.
  • Enable USB debugging on your phone.
  • Connect your phone to the PC.
  • Wait for it to install some Drivers and app on your phone.
  • Wait for it to detect your phone.
  • When connected,
  • Click Root.
  • Now, Download and Install Root checker app on your phone. Open Root checker app and click on check your phone is rooted or not.
I heard that Kingoroot does not root Android 6.0 but I don’t know how true that might be, you can give it a try and tell us if it rooted your phone.
  1. Root Genius.
Root Genius is a software developed by Shuame and one of the best rooting software for Android phones.

How to root SPICE F311 Android phone with Root Genius.

  • Download the software.
  • Install the software on your pc.
  • Install ADB Driver On Your PC ( If already installed Skip It )
  • Get a detectable working USB cord.
  • Enable USB debugging on your phone.
  • Connect your phone to the PC.
  • wait for it to detect your phone.
  • Click Root it to start rooting your phone.
  • Now, Downloadand Install Root checker app on your phone. Open Root checker app and click on check your phone is rooted or not.
  1. One Click Root.
One click root like the name goes roots thousands of phones and counting. You can take the advantage of that.

Features of One Click Root are.

  • One Click Root.
  • Unroot anytime.
  • Reliability of the software.
  • Roots most Android versions and counting.
  • But most features are premium though.

How to root SPICE F311 Android phone with One Click Root.

  1. Download the software.
  2. Install the software on your pc.
  3. Install ADB Driver On Your PC ( If already installed Skip It )
  4. Get a detectable working USB cord.
  5. Enable USB debugging on your phone.
  6. Connect your phone to the PC.
  7. Wait for it to install some Drivers and app on your phone.
  8. Wait for it to detect your phone.
  9. When connected,
  10. Click Root Now.
  11. Now, Download and Install Root checker app on your phone. Open Root checker app and click on check your phone is rooted or not.
wait for it to root your phone and done.
  1. Mobogenie.
Do you know that you can root your phone using the popular mobogenie software? though it might sound new to you it still roots most phones. it works as one-click rooting and I never get a failed message. The only thing needed is a good internet connection.

How to root SPICE F311 Android phone with Mobogenie.

  1. Download Mobogenie.
  2. Install the Mobogenie to your pc.
  3. Launch the software.
  4. Install ADB Driver On Your PC ( If already installed Skip It )
  5. Get a detectable working USB cord.
  6. Enable USB debugging on your phone.
  7. Connect your phone to the PC.
  8. Wait for it to install some Drivers and app on your phone.
  9. Wait for it to detect your phone.
  10. When connected,
  11. Go to My phone.
  12. Click on One Click Root.
  13. Click Root.
  14. Now, Download and Install Root checker app on your phone. Open Root checker app and click on check your phone is rooted or not.
When it is done, check your phone and you will see a Kinguser app on your phone.

Reasons Why rooting might not work for you.

Like we said above, something someone else and it worked for, you might try it and the thing may not work for you, it does happen.
But we have listed below things that might give to the reason this method didn’t work out for you.
  1. Slow Internet Connection.
This is the number one reason of failed rooting while using kingRoot app. It needs strong Internet Connection, once you are not having a strong Internet Connection, you might keep getting Root failed message. The best thing to do is find a strong Internet Connection and you will see the magic.
  1. Cloned or an Unoriginal device.
Many phones are cloned every day due to maybe its high market demand and the Chinese are not tired of showcasing their handwork. The phone you are using might not be the original chipset of the main phone but a cloned one. Everything might look the same but the phone retailer has hammered you with the wrong product. You may have to verify very well.
and some other things that we might not have known about.
Gihosoft Android data recovery Free is a super awesome software specialized in Android file recovery. With this program, you are able to recover deleted photos, music, videos, messages, contacts, call logs, WhatsApp messages, Viber chat history and more from Samsung, Huawei, LG, HTC, Motorola, Google, Oneplus, Sony, Lenovo, ZTE and other Android devices directly. Meanwhile, this Android data recovery software is available for both Windows and Mac platforms.

Sunday, 8 July 2018

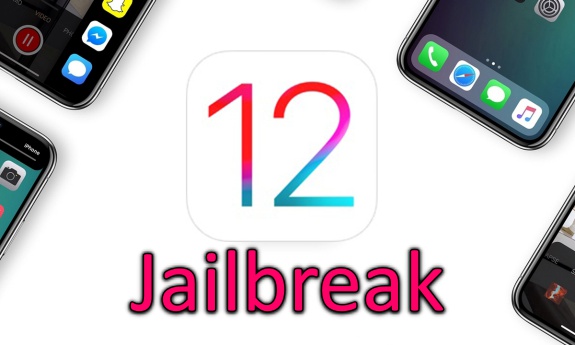
Houdini – iOS 12 Jailbreak Achieved by Abraham Masri


Apple seeded first developer beta of upcoming iOS 12 latest firmware in WWDC18. Unexpectedly, iOS 12 jailbreak has already been successfully achieved by the hacker.  Here’s all you need to know about Houdini jailbreak update for iOS 12.
Abraham Masri, the developer of Houdini semi jailbreak for iOS 11 – 11.3.1 and iOS 10 has successfully achieved iOS 12 jailbreak. He tweeted a photo of Houdini jailbreak on iPhone 7 device running iOS 12 latest version.
Apple is considering the iOS 12 as a Stability and Performance based update means iOS 12 jailbreak is not easy. But, Abraham Masri has proven that iOS 12 is also jailbreakable.
Here’s what he posted on his Twitter.
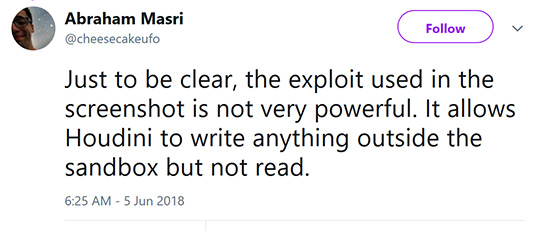
However, the exploit that used to jailbreak iOS 12 is not very powerful and it only allows Houdini to write anything outside the sandbox but not read. but it is great achievement and now we know iOS 12 jailbreak development has already started.
iOS 12 still on developing stage. Apple will continue testing & securing iOS 12 as much as possible. Meanwhile, hacker are working hard to liberate iOS 12 with proper jailbreak solutions. Wait and see, until Apple releases the first public version of iOS 12 and let’s hope up that the iOS 12 jailbreak will alive at the time.
Sponsor Ads:
Gihosoft Free iPhone Data Recovery is a professional iPhone Data Recovery software to get back all your lost text message, photo, video, call history, note, contact and more from iPhone/iPad/iPod Touch.
Gihosoft Android data recovery Free is a super awesome software specialized in Android file recovery. With this program, you are able to recover deleted photos, music, videos, messages, contacts, call logs, WhatsApp messages, Viber chat history and more from Samsung, Huawei, LG, HTC, Motorola, Google, Oneplus, Sony, Lenovo, ZTE and other Android devices directly. Meanwhile, this Android data recovery software is available for both Windows and Mac platforms.

Saturday, 16 June 2018

How to Delete Numbers from iPhone?


Delete Phone Numbers from Contacts List One by One

All iDevices have a built-in contact deletion feature that allows you to delete unwanted numbers from your contacts list.

Steps to Delete Contacts from iPhone

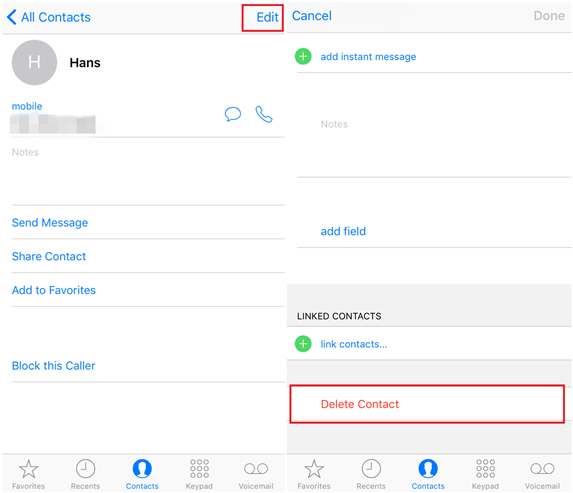
Step 1. Open Contacts app on your iPhone.
Step 2. Find a contact that you wish to delete and open the contact page by tapping the contact name.
Step 3. Now tap Edit and then find and select the 'Delete Contact' option.
delete-iphone-contacts
Step 4. You will need to tap Delete Contact again to confirm your action. The contact will now be deleted from your iPhone's contacts list.Sponsor Ads:
Gihosoft iPhone Data Recovery is a professional iPhone Data Recovery software to get back all your lost text message, photo, video, call history, note, contact and more from iPhone/iPad/iPod Touch. It offers a full solution to recover your lost data in different tough situations. Besides recovering data directly from iPhone, iPad and iPod touch, it also allows you to recover data from iCloud and iTunes backup files.

Note
One con of this method is that you cannot delete multiple contacts, instead you will have to delete contacts one by one. Another con is that contacts deleted via this method can be recovered by a professional tool such as iMyFone Umate Pro so it's not a good option to protect your privacy.
If you have already deleted contacts from your iPhone and want to permanently erase them so that they cannot be recovered, then it is recommended that you use third-party software iMyFone Umate Pro. You can use Umate Pro to make your deleted iPhone contacts 100% unrecoverable.

How to Backup iPhone without Computer


Can You Backup Your iPhone without a Computer?

There are two ways through which you can back up your iPhone without a computer. And we will discuss these two ways in the following part. Please keep scrolling and reading and find the solutions for how you can take backup of your iPhone without using your computer.

A. Backup using iCloud

The first way to backup iPhone is to use iCloud. iCloud is an Apple's cloud service that offers 5GB of storage and requires a stable internet connection. Therefore, make sure that you have a good internet connection while you use this method. To backup, follow the steps given below.
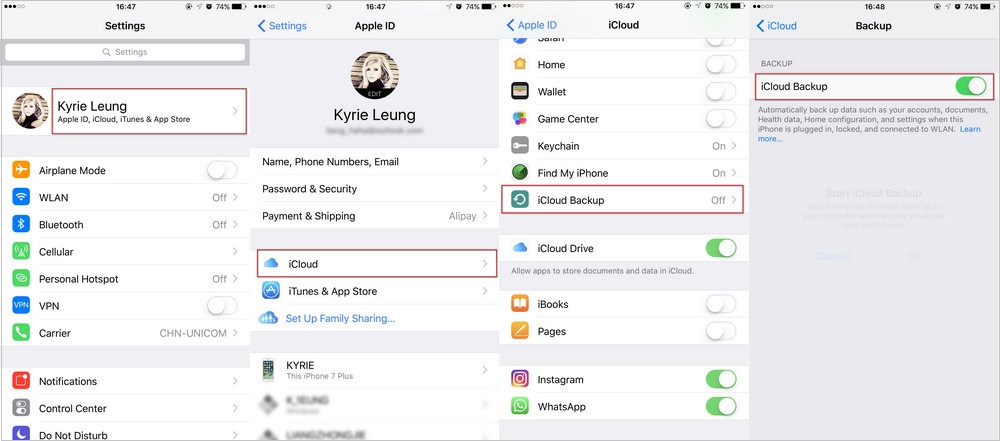
  • First of all, open 'Settings' in your iPhone.
  • Tap on your 'Apple ID' now or '[your name]' if you're running iOS 11. Go into the 'iCloud' tab and then scroll down to select the 'iCloud Backup' option.
  • Now, make sure to slide the toggle switch to turn on the iCloud backup if it is not already and proceed to the next step.
  • Once you've enabled iCloud Backup you are good to go to initiate the backup. You'll now notice that, 'Back Up Now' button is available for you in the middle of the screen. Hit on it to initiate the process of backing up iPhone without the access of a computer.
backup iPhone using iCloud

b. Backup using Google Drive

Here is another way to backup iPhone without computer. That's using Google Drive. It is a file storage service developed by Google that aims to offer 15GB of storage to the users in order to get their files uploaded. To use this method, again you will need to have a good Wi-Fi network. But the downside of using this way will be that you will only be allowed to backup contacts, photos, calendar on iPhone.Gihosoft iPhone Data Recovery is a professional iPhone Data Recovery software to get back all your lost text message, photo, video, call history, note, contact and more from iPhone/iPad/iPod Touch. It offers a full solution to recover your lost data in different tough situations. Besides recovering data directly from iPhone, iPad and iPod touch, it also allows you to recover data from iCloud and iTunes backup files.

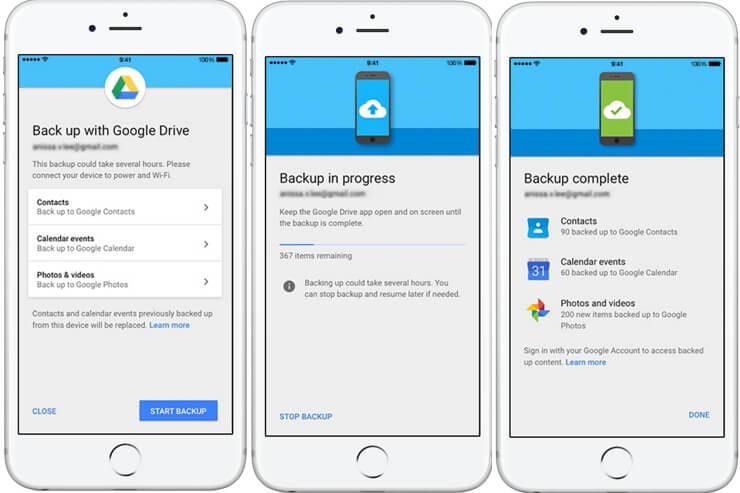
  • Take your iPhone and install Google Drive app.
  • Launch the Google Drive app after installing it on your iPhone and tap on the 'menu' icon. The menu icon will be in the form of three horizontal lines on the top left.
  • Once you hit on it, you then need to choose the 'Settings' tab from the options available.
  • Lastly, you are required to hit on the 'Backup' tab and then push the 'START BACKUP' button to initiate the process. That's it, now you've backed up your iPhone contacts, photos, calendar without a computer.
backup iPhone using Google drive

Wednesday, 13 June 2018

How to Download Paid Apps & Games for free from Safari Browser..No Jailbreak No App required!

Confused

with the title?? Well this is true. This is a new method for downloading apps

and games from Safari Browser of your iOS device without having to pay any

penny. You even don’t have to download the third party apps like vShare. This

is a completely new method for downloading apps and games.

This website

is completely safe and easy to download your favorite apps and games. I tried

this site and was really impressed by its service. It is really easy and simple

to use . So if you also like to get paid apps for free without any apps or

jailbreak then simply follow these steps.

Let’s get

started…

Step 1: Open

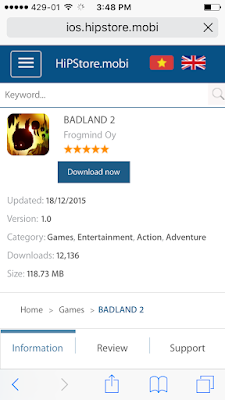
the Safari Browser and type ios.hipstore.mobi in the address bar.
Step 2: Now

type the name of the app or game that you wish to install in the search bar. (I

entered Badland 2 which is $4.99 on AppStore) and Click on the correct result that are displayed.
Step 3: You

will now see the Download now tab. Tap on that.
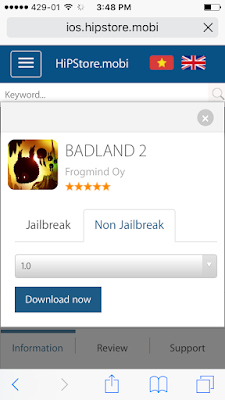
Step 4: You

will now have an option to select the versions of the particular game or

application. Select the desired version that you wish to install and hit

Download now.
Step 5: A

pop up message will appear. Tap on open. (Don’t worry you will not be

redirected to the AppStore)
Step 6: Wait

for 10-15 seconds and you will see another pop up message. Hit install and you’re

good to go.
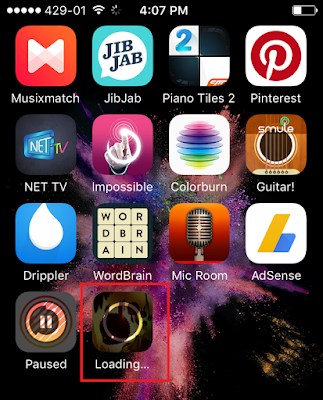
Step 7: Go

to your homescreen and you may see your app downloading there.
So what you

think about this awesome trick?

Do you like this story?
Sponsor Ads:
Gihosoft iPhone Data Recovery is a professional iPhone Data Recovery software to get back all your lost text message, photo, video, call history, note, contact and more from iPhone/iPad/iPod Touch. It offers a full solution to recover your lost data in different tough situations. Besides recovering data directly from iPhone, iPad and iPod touch, it also allows you to recover data from iCloud and iTunes backup files.

Let us know

in the comments below.

Friday, 8 June 2018

Unlock iPhone without Pressing Any Button

Unlock iPhone without Pressing Any Button

Unlock iPhone without Home Button

This method involves changing the iPhone lock screen behavior so that you can unlock iPhone without home button. The following steps should help you unlock iPhone without using home button:
Step 1: Open settings and then tap General.
Step 2: Locate Accessibility in the General menu and click it.
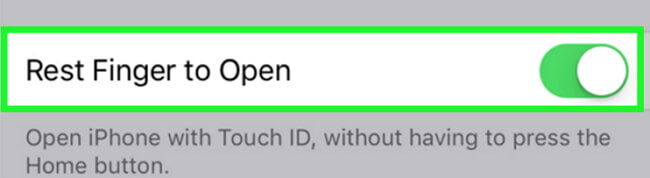
Step 3: Scroll down to Home Button. Toggle on Rest Finger to Open. This will allow you to unlock your iPhone by simply placing your finger on its Home button instead of pressing it.
rest-finger-to-open

Unlock iPhone without Power Button

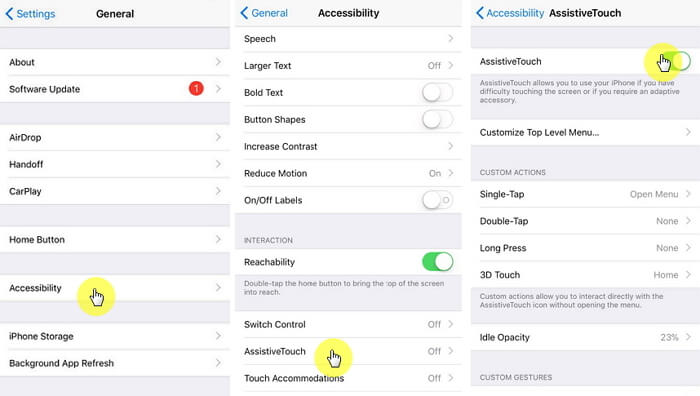
For this method to work, you need to enable AssistiveTouch on the iPhone. To turn on AssistiveTouch, follow these steps:
Step 1: Visit Settings, tap General and then Accessibility.
Step 2: Locate AssistiveTouch and toggle it on.  
enable-assistivetouch-on-iphone
After turning on AssistiveTouch, follow the steps below to unlock your device without pressing the power button:
Step 1: Open AssistiveTouch menu by tapping the Virtual Home icon and then tap Device.
Step 2: Tap Unlock screen.
Gihosoft iPhone Data Recovery is a professional iPhone Data Recovery software to get back all your lost text message, photo, video, call history, note, contact and more from iPhone/iPad/iPod Touch. It offers a full solution to recover your lost data in different tough situations. Besides recovering data directly from iPhone, iPad and iPod touch, it also allows you to recover data from iCloud and iTunes backup files. What's more, it supports Smart Recovery modes that can find your iPhone data quickly.
assistive-touch

How to Delete iMessage History on Mac or iPhone/iPad 2019 Guide? [Solved]

How to Delete iMessage History on Mac? Deleting iMessage history on Mac is quite easy. There are two common methods: Disable "Save hist...